Lesson 5: Concentrated Liquidity Mastery

Lesson 5: Concentrated Liquidity Mastery

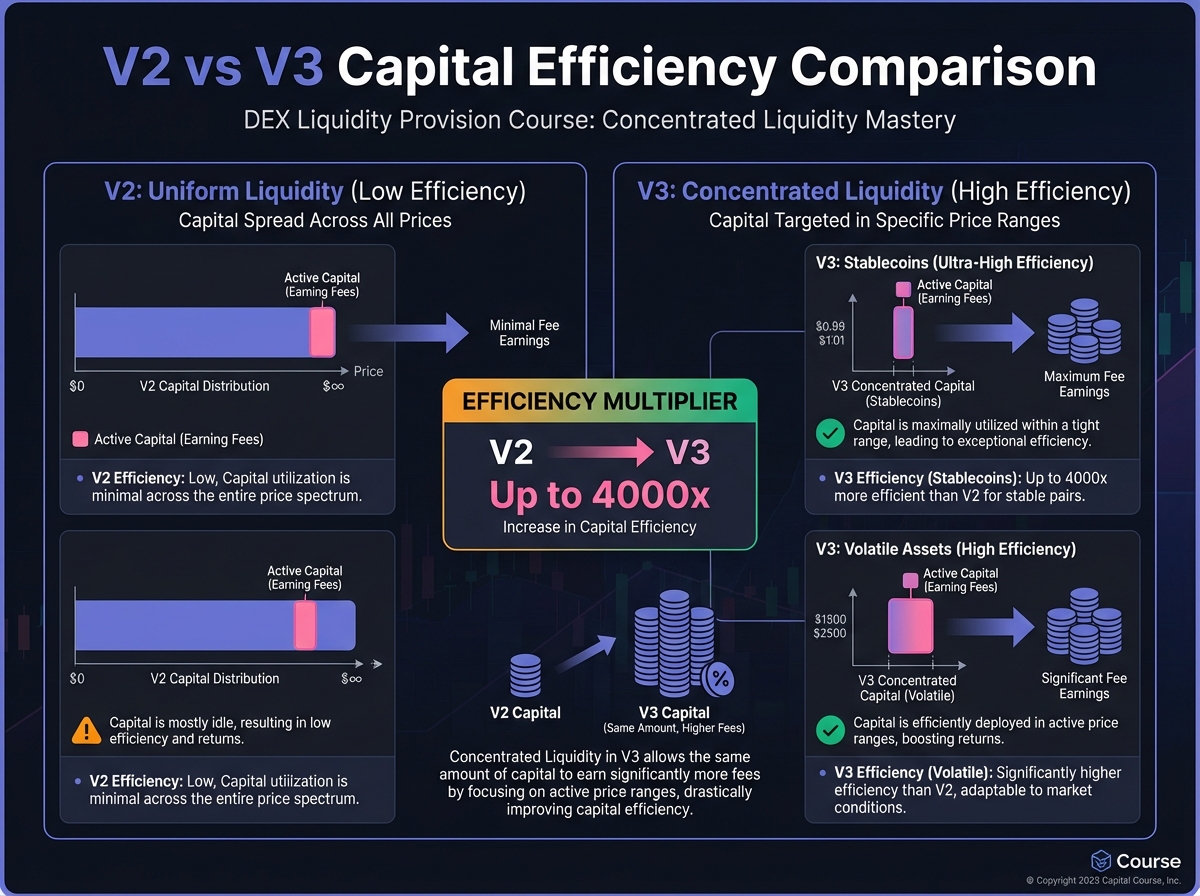
🎯 Core Concept: 4000x Capital Efficiency

Uniswap V3's concentrated liquidity allows you to earn the same fees as V2 with 4000x less capital—but only if you manage it correctly. This lesson teaches you to master V3's most powerful and dangerous feature.

The V3 Revolution

V2 Problem: 99.9% of your capital sits idle, earning no fees V3 Solution: Concentrate liquidity in a price range where trades actually happen The Trade-off: Higher efficiency = higher risk if price exits your range

📊 Understanding Concentrated Liquidity

The Core Innovation

Instead of providing liquidity across the entire price curve (0 to ∞), V3 lets you choose a price range [P_min, P_max] where your liquidity is active.

Key Concept: Your liquidity only earns fees when the current price is within your range.

Capital Efficiency Example

Stablecoin Pair (USDC/DAI trading at $1.00):

  • V2: Need $4,000,000 to earn fees on $1,000,000 in volume

  • V3 (0.1% range): Need only $1,000 to earn the same fees

  • Efficiency Gain: 4000x

Volatile Pair (ETH/USDC):

  • V2: Need $100,000 for $10,000 in active liquidity

  • V3 (±10% range): Need only $5,000 for the same

  • Efficiency Gain: 20x

V2 vs V3 Capital Efficiency Comparison

The Double-Edged Sword

When Price Stays in Range:

  • ✅ You earn maximum fees per dollar

  • ✅ Capital efficiency is incredible

  • ✅ Returns can be 10-100x higher than V2

When Price Exits Range:

  • ❌ Your position becomes 100% one asset

  • ❌ You stop earning fees

  • ❌ You're exposed to that asset's price movement

  • ❌ IL is magnified

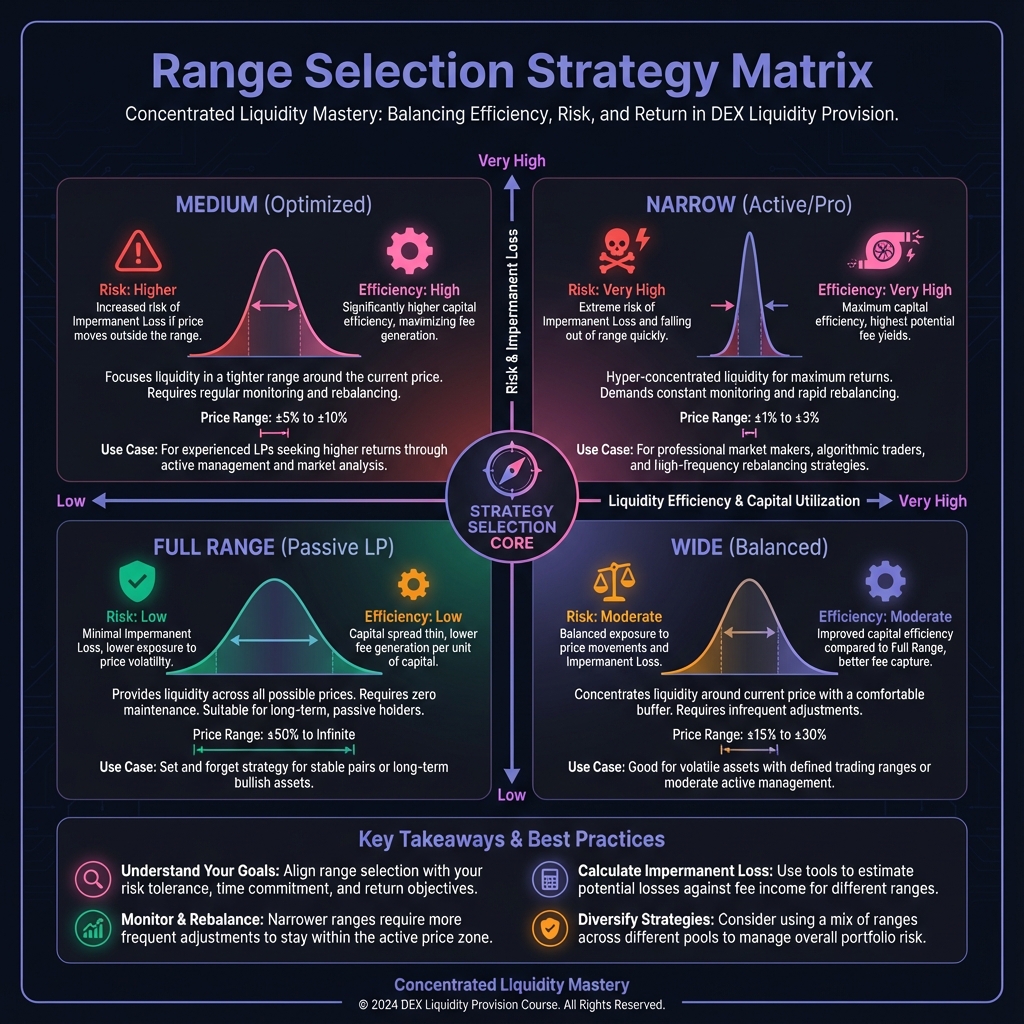
🎯 Range Selection Strategies

Strategy 1: Full Range (V2 Equivalent)

Range: Current price ± 50% or more

  • Risk: Low (rarely goes out of range)

  • Efficiency: Low (similar to V2)

  • Best For: Beginners, passive LPs, volatile pairs

Example: ETH at $2,000, range $1,000 - $3,000

Strategy 2: Wide Range

Range: Current price ± 20-50%

  • Risk: Moderate

  • Efficiency: Moderate (5-10x V2)

  • Best For: Moderate volatility, less active management

Example: ETH at $2,000, range $1,600 - $2,400

Strategy 3: Medium Range

Range: Current price ± 10-20%

  • Risk: Higher (needs monitoring)

  • Efficiency: High (10-20x V2)

  • Best For: Active LPs, correlated pairs

Example: ETH at $2,000, range $1,800 - $2,200

Strategy 4: Narrow Range (Advanced)

Range: Current price ± 1-5%

  • Risk: Very high (frequent rebalancing)

  • Efficiency: Very high (50-4000x V2)

  • Best For: Stablecoins, highly correlated pairs, professional LPs

Example: USDC/DAI at $1.00, range $0.999 - $1.001

Range Selection Strategy Matrix

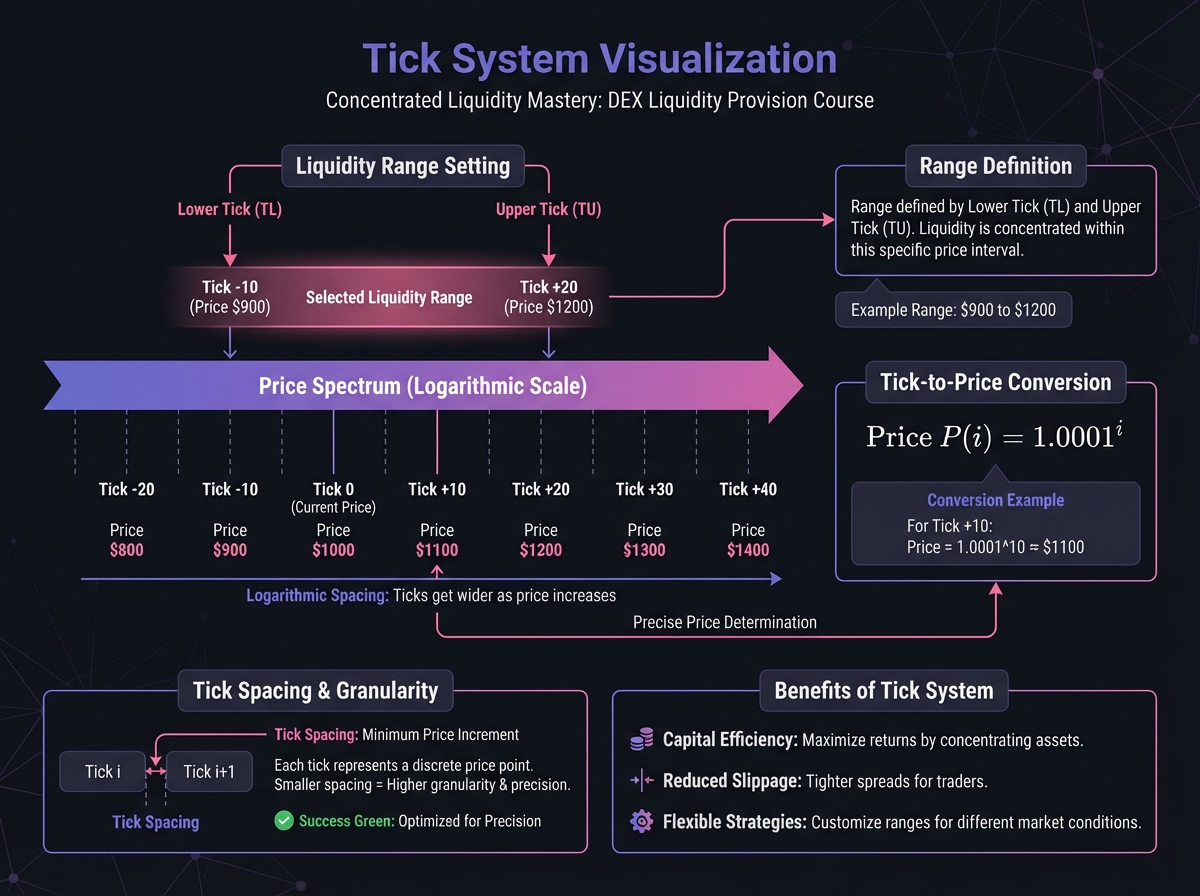
🔢 Understanding Ticks

What Are Ticks?

Ticks are discrete price points where liquidity can be placed. The price at tick i is:

P(i)=1.0001iP(i) = 1.0001^i

Key Properties:

  • Each tick = 0.01% (1 basis point) price change

  • Logarithmic spacing (consistent % changes)

  • Not every tick is usable (tick spacing)

Tick Spacing

To save gas, pools use "tick spacing":

  • 0.01% fee tier: Tick spacing = 1 (every tick)

  • 0.05% fee tier: Tick spacing = 10 (every 10th tick = 0.1% increments)

  • 0.3% fee tier: Tick spacing = 60 (every 60th tick = 0.6% increments)

  • 1% fee tier: Tick spacing = 200 (every 200th tick = 2% increments)

Implication: You can only set ranges at these tick boundaries.

Calculating Your Range in Ticks

Example: ETH/USDC pool, current price $2,000

  • Want range: $1,800 - $2,200 (±10%)

Step 1: Convert prices to ticks

  • Lower: $1,800 / $2,000 = 0.9

  • Upper: $2,200 / $2,000 = 1.1

Step 2: Find tick indices (simplified)

  • Use Uniswap interface (it calculates automatically)

  • Or use formula: tick = log₁.₀₀₀₁(price_ratio)

Result: Range might be tick -1000 to tick +1000 (example)

Tick System Visualization

💰 Fee Accumulation in V3

How Fees Work Differently

V2: Fees auto-compound (stay in pool, increase LP token value) V3: Fees accumulate separately, must be collected manually

Why: Each position has unique ranges, can't auto-compound easily

Collecting Fees

When to Collect:

  • Before rebalancing (to avoid losing fees)

  • When fees exceed gas costs (on L2, collect more frequently)

  • Monthly for passive positions

Gas Costs:

  • L1: $20-50 per collection

  • L2: $0.20-1.00 per collection

Best Practice: On L2, collect weekly. On L1, collect monthly or when fees > $100.

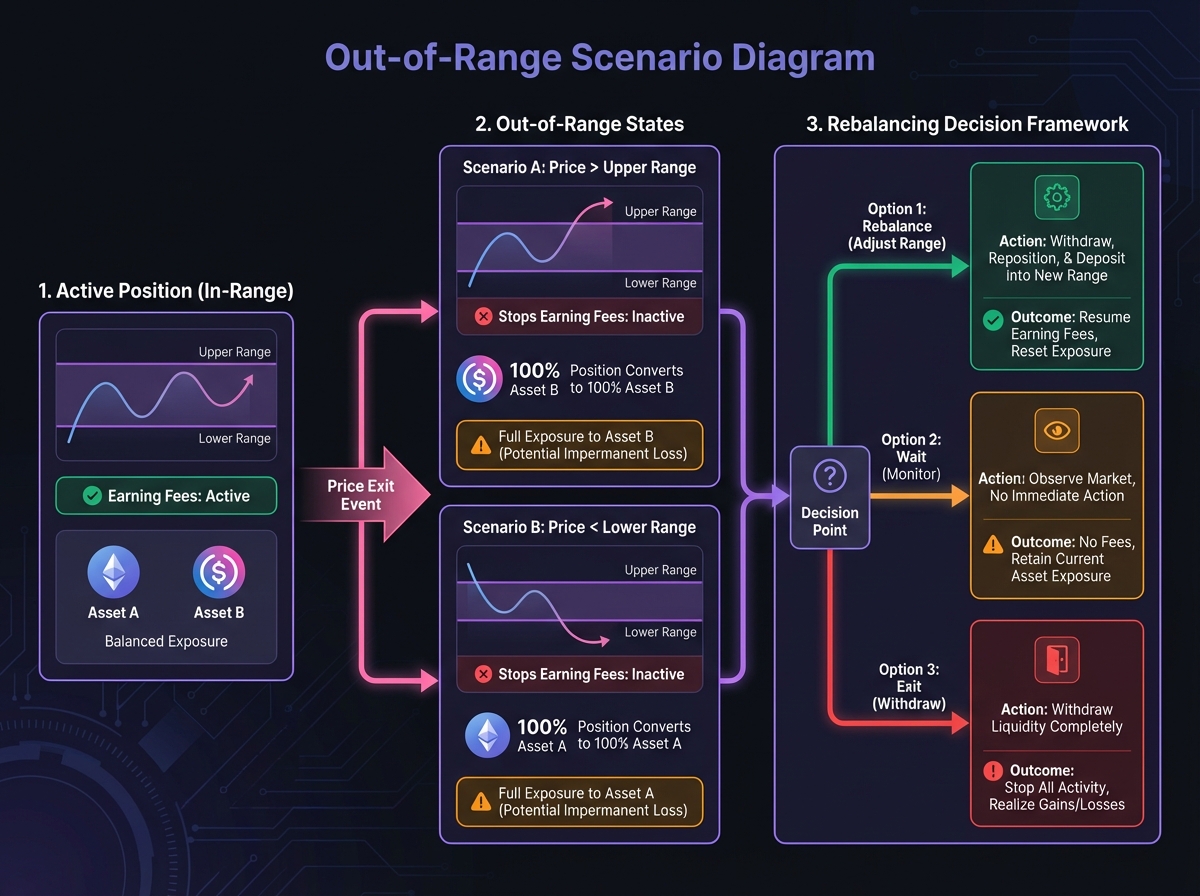
⚠️ The Out-of-Range Problem

What Happens When Price Exits Range

Price Above Upper Bound:

  • Position becomes 100% quote asset (USDC)

  • Stops earning fees

  • Exposed to quote asset devaluation (usually minimal for stablecoins)

Price Below Lower Bound:

  • Position becomes 100% base asset (ETH)

  • Stops earning fees

  • Exposed to base asset price movement (can be significant)

The Panic Trap

Common Mistake: LP sees position is 100% ETH while price is crashing, panics and withdraws.

Why This Loses Money:

  • You effectively bought ETH at higher prices (within your range)

  • Now selling at lower price

  • Locking in IL + realized loss

Better Strategy:

  • Wait for price to return to range, OR

  • Rebalance to new range around current price

Rebalancing Strategy

When Price Exits Range:

  1. Assess the Situation:

    • How far out of range? (5%? 20%? 50%?)

    • Is this a temporary move or trend?

    • What are gas costs vs. fees if you rebalance?

  2. Decision Framework:

    • <5% out: Wait, likely to return

    • 5-20% out: Consider rebalancing if trend continues

    • >20% out: Rebalance to new range (unless expecting reversal)

  3. Rebalancing Process:

    • Withdraw old position (collect fees first!)

    • Swap tokens to correct ratio

    • Create new position around current price

    • Set appropriate range width

Out-of-Range Scenario Diagram

🎓 Beginner's Corner: V3 Common Mistakes

Mistake 1: Setting ranges too narrow

  • Fix: Start wide (±20-50%), narrow as you learn

Mistake 2: Not monitoring positions

  • Fix: Check weekly, set price alerts

Mistake 3: Forgetting to collect fees

  • Fix: Set calendar reminder, collect monthly

Mistake 4: Panic withdrawing when out of range

  • Fix: Wait or rebalance, don't panic

Mistake 5: Ignoring gas costs

  • Fix: Use L2, calculate total costs

Mistake 6: Setting ranges based on current price only

  • Fix: Consider volatility, set wider ranges for volatile assets

🔬 Advanced Deep-Dive: Virtual Liquidity Math

The Virtual Reserves Concept

V3 uses "virtual reserves" to simulate deeper pools:

L=xrealyrealL = \sqrt{x_{real} \cdot y_{real}}

Where L is liquidity, and virtual reserves are calculated to make the curve intercept your range boundaries.

Capital Efficiency Formula

For a range [P_a, P_b] around current price P:

Efficiency=PbPa2P×Multiplier\text{Efficiency} = \frac{P_b - P_a}{2P} \times \text{Multiplier}

Example: Range $1.99 - $2.01 around $2.00

  • Width: $0.02 / $2.00 = 1%

  • Efficiency: ~100x (simplified)

Optimal Range Width

For Stablecoins (volatility ~0.1%):

  • Optimal range: ±0.05-0.1%

  • Efficiency: 2000-4000x

For Correlated Pairs (volatility ~1%):

  • Optimal range: ±2-5%

  • Efficiency: 20-50x

For Volatile Pairs (volatility ~5%+):

  • Optimal range: ±10-20%

  • Efficiency: 5-10x

📈 Real-World V3 Strategy

Complete Example: ETH/USDC Position

Setup:

  • Current ETH price: $2,000

  • Capital: $10,000

  • Strategy: Medium range, active management

Range Selection:

  • Lower: $1,800 (10% below)

  • Upper: $2,200 (10% above)

  • Width: 20%

Position Details:

  • Deposit: 2.5 ETH + 5,000 USDC

  • Range: Tick -1000 to +1000 (example)

  • Fee tier: 0.05%

Month 1 (Price stays in range):

  • Fees earned: $150 (1.5% of capital)

  • IL: $20 (0.2%, minimal)

  • Net return: $130 (1.3% monthly = 15.6% APY)

Month 2 (Price exits range, drops to $1,700):

  • Position: 100% ETH (5.88 ETH, 0 USDC)

  • No fees earned (out of range)

  • IL: $500 (5% of capital)

  • Action: Rebalance to new range $1,530 - $1,870

Analysis:

  • Month 1: Profitable ✅

  • Month 2: Lost money due to IL ❌

  • Net: Still profitable if price returns

🎯 Key Takeaways

  1. V3 offers 4000x efficiency for stablecoins, 20x for volatile pairs

  2. Range selection is critical—too narrow = high risk, too wide = low efficiency

  3. Monitor positions weekly—out-of-range positions earn no fees

  4. Collect fees regularly—they don't auto-compound in V3

  5. Rebalance strategically—don't panic when price exits range

  6. Use L2—gas costs make active management viable

  7. Start wide, narrow gradually—learn before optimizing

🚀 Next Steps

Lesson 6 explores other major DEX protocols (Aerodrome, Raydrome, Orca) and when to use each. Understanding multiple protocols lets you optimize across ecosystems.

Complete Exercise 5 to practice range selection and V3 position management.


Remember: V3 is powerful but requires active management. Start conservative, learn the mechanics, then optimize. The efficiency gains are real, but so are the risks.

← Back to Summary | Next: Exercise 5 → | Previous: Lesson 4 ←

Last updated