Lesson 4: Your First Money Market Position
🎧 Lesson Podcast
🎬 Video Overview
Lesson 4: Your First Money Market Position
🎯 Core Concept: Start Simple, Start Safe
Your first money market position should be a learning experience, not a high-stakes gamble. This lesson walks you through setting up your first safe deposit, understanding the interface, and monitoring your position correctly.
The First-Time Participant Checklist
Before you deposit a single token, ensure you:
✅ Understand the basics (Lessons 1-3)
✅ Have calculated your risk tolerance
✅ Chosen a beginner-friendly protocol (Aave recommended)
✅ Have funds on Layer 2 (for lower gas costs)
✅ Know how to monitor your position
🏁 Step 1: Choose Your First Protocol
For Absolute Beginners: Start with Aave
Why Aave?
✅ Largest, most established protocol
✅ Extensive audits and safety track record
✅ Simple interface
✅ Insurance options available (Aave App)
✅ Largest liquidity pools
✅ Good documentation
Two Entry Paths:
Path A: Aave App (Recommended)
Mobile app (iOS, Android)
Insurance coverage up to $1M
Simplified interface
No gas management
Best for: Saving/earning yield only
Path B: Aave V3 dApp
Full-featured web interface
Direct protocol interaction
Can use crypto as collateral
Best for: Borrowing or advanced strategies
Alternative: Start on Layer 2
For your first position, use Arbitrum or Base:
Lower gas costs (practice without high fees)
Still large liquidity pools
Same security as mainnet
Better for learning and experimentation
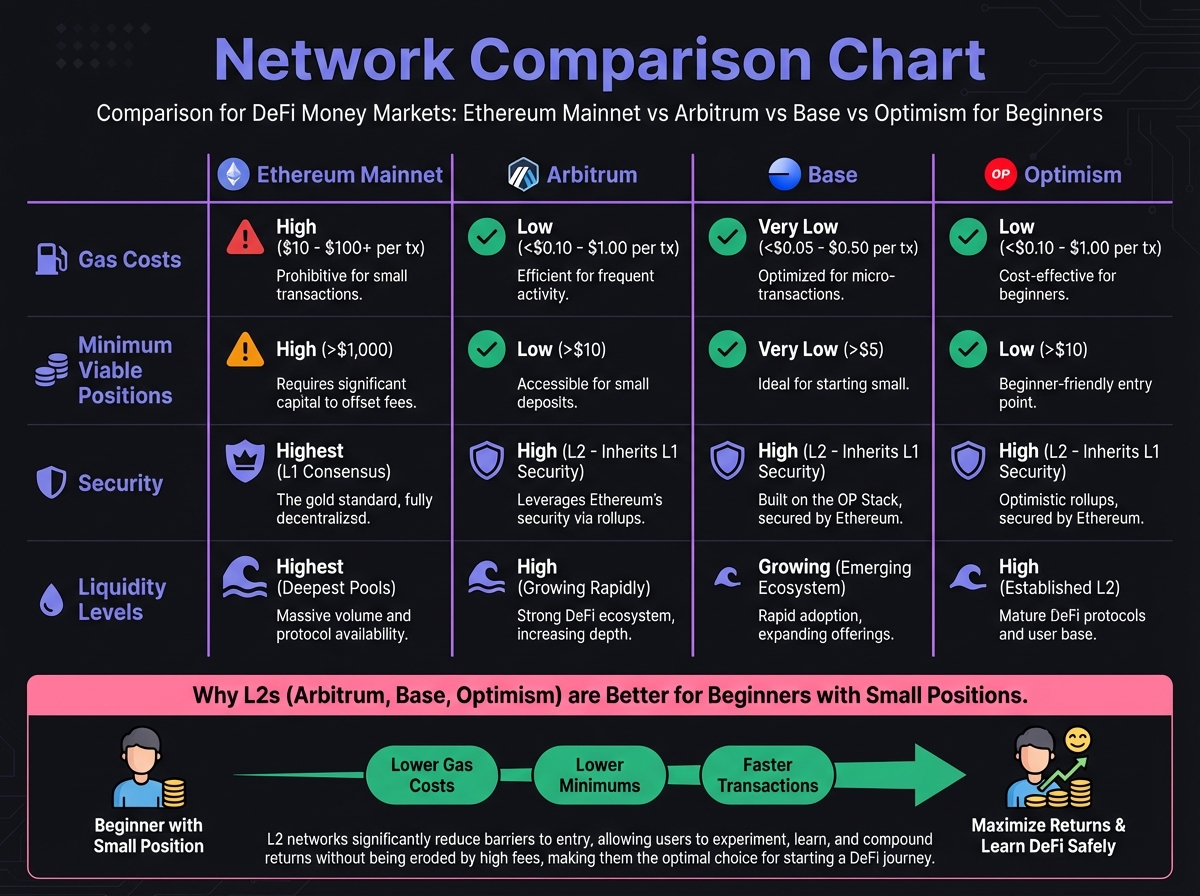
🌐 Step 2: Choose Your Network
Network Selection Guide
Ethereum Mainnet:
Gas costs: $20-100+ per transaction
Only viable for: Large positions ($10k+)
Best for: Maximum security, largest liquidity
Not recommended for first position
Arbitrum (Recommended for beginners):
Gas costs: $0.20-1.00 per transaction
Viable for: Small positions ($100+)
Security: Inherited from Ethereum
Liquidity: Very high
Best choice for learning
Base (Good alternative):
Gas costs: $0.10-0.50 per transaction
Viable for: Small positions
Security: Inherited from Ethereum
Liquidity: Growing rapidly
Good for cost-sensitive beginners
Optimism:
Gas costs: $0.15-0.80 per transaction
Viable for: Small positions
Similar to Arbitrum
Getting Funds on Layer 2
From Ethereum Mainnet:
Use official bridge: Arbitrum Bridge or Base Bridge
Bridge USDC or ETH
Wait for confirmation (usually 10-15 minutes)
Funds appear in your wallet on L2
From Centralized Exchange:
Many exchanges support direct L2 withdrawals
Withdraw USDC directly to Arbitrum/Base address
Saves bridging step
💰 Step 3: Choose Your Asset
Start with Stablecoins
For your first position, only supply stablecoins (USDC, USDT, DAI).
Why Stablecoins First?
✅ No price volatility risk
✅ Can't get liquidated (you're not borrowing)
✅ Simple: deposit and earn yield
✅ Low risk learning experience
Recommended Stablecoins:
USDC (USD Coin) - Most widely accepted
USDT (Tether) - High liquidity
DAI (Dai Stablecoin) - Decentralized alternative
What About Crypto Collateral?
Don't use crypto as collateral on your first position!
Wait until:
You understand Health Factor monitoring
You have experience monitoring positions
You understand liquidation risks
You're comfortable with volatility
Start simple: Supply USDC → Earn yield → Understand the system → Then explore borrowing later.
🔧 Step 4: Set Up Your Wallet
Wallet Options
MetaMask (Most Popular):
Browser extension
Mobile app available
Supports all networks
Good for beginners
WalletConnect-Compatible Wallets:
Rainbow
Coinbase Wallet
Trust Wallet
Works with many DeFi interfaces
Wallet Setup Checklist
Create or import wallet
Write down seed phrase (store securely!)
Never share seed phrase
Consider hardware wallet for larger amounts
Add network
Add Arbitrum network (if using Arbitrum)
Add Base network (if using Base)
Use chainlist.org for verified RPCs
Fund wallet
Send small amount of ETH for gas
Send USDC for your first deposit
Keep extra ETH for gas fees
Verify security
Check you're on correct network
Bookmark official Aave website
Be cautious of phishing sites
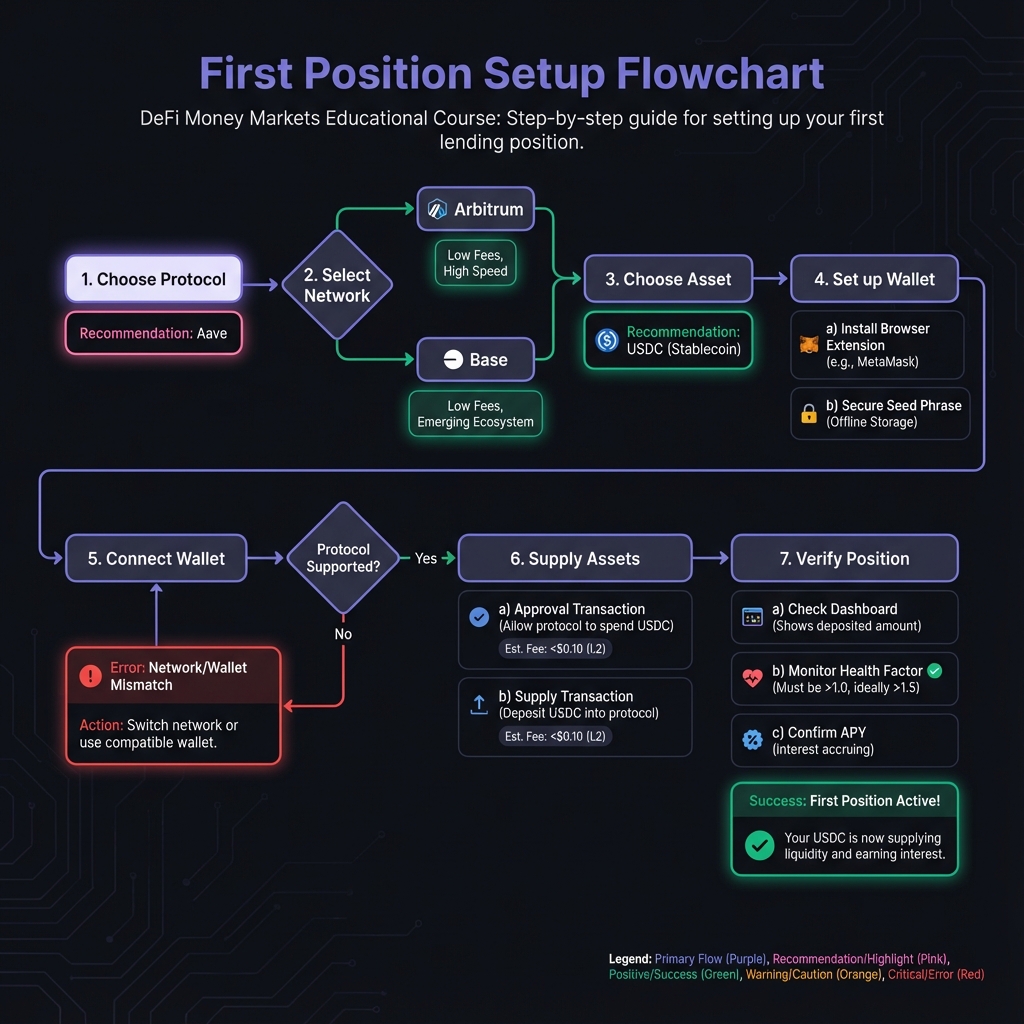
📱 Step 5: Make Your First Supply
Using Aave V3 dApp (Step-by-Step)
1. Connect Wallet
Go to app.aave.com
Click "Connect Wallet"
Select your wallet (MetaMask, etc.)
Approve connection
2. Select Network
Switch to Arbitrum (or your chosen L2)
Confirm network switch in wallet
Wait for interface to load
3. Navigate to Supply
Click "Supply" tab in interface
Browse available assets
Select USDC (or your chosen stablecoin)
4. Enter Amount
Enter amount you want to supply
Interface shows:
APY (annual percentage yield)
Collateral status (toggle OFF for first position)
Transaction details
5. Review Details
Check APY rate
Verify network (should be Arbitrum/Base, not Mainnet)
Ensure "Use as Collateral" is OFF (for first position)
Review gas estimate
6. Approve Token (First Time Only)
Click "Approve" button
Confirm transaction in wallet
Wait for approval confirmation
This allows Aave to access your USDC
7. Supply
Click "Supply" button
Review transaction details
Confirm in wallet
Wait for confirmation
8. Verify
Check your wallet balance (should show aUSDC tokens)
Return to Aave dashboard
See your supplied balance
Check your APY earnings
Understanding Receipt Tokens
When you supply assets, you receive receipt tokens:
Supply USDC → Receive aUSDC (aToken USDC)
These tokens represent your deposit + accrued interest
Value increases over time as interest accrues
Burn to withdraw: Burn aUSDC → Receive USDC + interest
Example:
Supply 10,000 USDC
Receive 10,000 aUSDC
After 1 year at 5% APY
aUSDC balance: ~10,500 (representing $10,500 value)
Withdraw: Burn 10,500 aUSDC → Receive 10,500 USDC
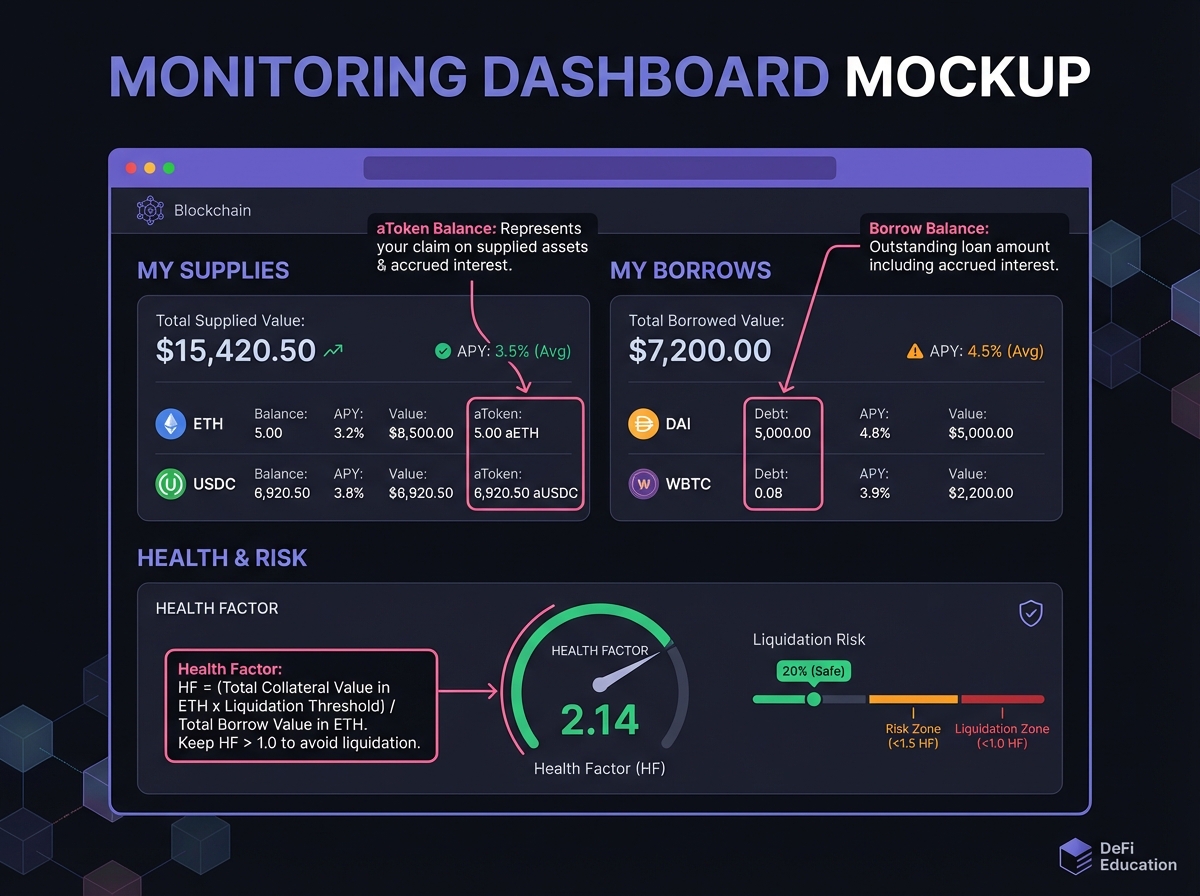
📊 Step 6: Understanding Your Dashboard
Key Metrics to Monitor
Supply Balance:
Your deposited amount
Grows over time (interest accrues)
Shows in both USDC and aUSDC terms
APY (Annual Percentage Yield):
Current yield rate
Changes based on utilization
Can fluctuate daily
Total Value:
Your position value
Includes accrued interest
Updates in real-time
Health Factor (if borrowing):
Only relevant if you have loans
For supply-only positions: N/A
Monitor if you start borrowing later
Collateral Toggle: Critical Setting
"Use as Collateral" Toggle:
OFF (Recommended for First Position):
✅ Earn yield only
✅ Zero liquidation risk
✅ Cannot borrow (which is good for beginners)
✅ Position is 100% safe from liquidation
ON (Advanced):
✅ Can borrow against collateral
❌ Exposed to liquidation risk
❌ Requires active monitoring
❌ Not recommended for first position
For Your First Position: Keep this OFF. You're just learning to earn yield. Borrowing comes later.
💡 Monitoring Your Position
Daily Checklist
Check your balance
Has your aToken balance increased?
This confirms interest is accruing
Check APY
Has the rate changed?
Understand why (utilization changes)
Review dashboard
Are there any warnings or alerts?
Is everything functioning normally?
Weekly Review
Calculate returns
Compare actual earnings to expected
Understand compounding effect
Review protocol health
Check utilization rates
Monitor for any protocol updates
Assess strategy
Are you comfortable with the risk?
Ready to explore borrowing?
Consider adding more funds?
Setting Up Alerts (Optional but Recommended)
Price Alerts:
Set on CoinGecko or CoinMarketCap
Alert if stablecoin depegs significantly
Monitor for protocol issues
Protocol Alerts:
Follow protocol Twitter/Discord
Subscribe to governance updates
Monitor security news
🎓 Beginner's Corner: Common First-Time Mistakes
Mistake 1: Supplying on Ethereum Mainnet
Why it's wrong: Gas fees can be $50-100
Fix: Use Arbitrum or Base for first positions
Mistake 2: Leaving "Use as Collateral" ON without understanding
Why it's wrong: Creates liquidation risk
Fix: Turn OFF for first position, learn borrowing later
Mistake 3: Not checking network
Why it's wrong: Might supply on wrong network
Fix: Always verify network in interface and wallet
Mistake 4: Supplying volatile crypto instead of stablecoins
Why it's wrong: Unnecessary risk for first position
Fix: Start with USDC only, learn the basics first
Mistake 5: Not monitoring position
Why it's wrong: Need to verify everything works
Fix: Check daily for first week, then weekly
Mistake 6: Approving unlimited token amounts
Why it's wrong: Security risk if protocol compromised
Fix: Approve only what you need (or use revoke.cash later)
🔬 Advanced Deep-Dive: Understanding aTokens
How aTokens Work
The Mechanism:
When you supply USDC, Aave mints aUSDC tokens
Your aUSDC balance = your deposit + interest
Interest accrues continuously (every block)
Value increases over time
The Formula: aTokenBalance=DepositAmount×(1+APY×Time)
Example:
Deposit: 10,000 USDC
APY: 5%
After 6 months: 10,000 × (1 + 0.05 × 0.5) = 10,250 aUSDC
Key Insight: You don't receive separate interest payments. The aToken itself increases in value.
Withdrawal Process
How to Withdraw:
Navigate to "Withdraw" tab
Select amount to withdraw
Click "Withdraw"
Confirm transaction
aTokens are burned, USDC returned
Important: You can withdraw anytime (if liquidity available). No lockup periods.
📈 Real-World Example: Your First $1,000 Deposit
Setup:
Deposit: $1,000 USDC
Protocol: Aave V3 on Arbitrum
APY: 5%
Position: Supply only (collateral OFF)
Month 1:
Starting balance: 1,000 aUSDC
Interest earned: ~$4.17 (5% ÷ 12 months)
Ending balance: ~1,004.17 aUSDC
Value: $1,004.17
Month 6:
Balance: ~1,025 aUSDC
Total interest: ~$25
Value: $1,025
Year 1:
Balance: ~1,050 aUSDC
Total interest: $50
Value: $1,050
Return: 5% APY
If APY Changes to 6% (utilization increases):
Your position continues earning
Rate updates automatically
No action needed
New earnings at 6% APY
Withdrawal (after 1 year):
Burn 1,050 aUSDC
Receive ~1,050 USDC
Gas cost: ~$0.50 on Arbitrum
Net profit: ~$49.50
⚠️ Important Safety Reminders
Before Your First Deposit
Verify website
Always use official Aave site
Check URL carefully
Bookmark official site
Check network
Confirm you're on correct network
Don't mix mainnet and L2 addresses
Start small
First deposit: $100-500
Test the process
Verify everything works
Then scale up
Keep records
Screenshot transaction hashes
Record your aToken balance
Track your earnings
After Your First Deposit
Verify in wallet
Check you received aTokens
Verify balance is correct
Check dashboard
Position appears correctly
APY is as expected
No error messages
Test withdrawal (after a few days)
Withdraw small amount
Verify process works
Confirm funds return correctly
🔑 Key Takeaways
Start with Aave on Arbitrum/Base for lowest risk and gas costs
Supply stablecoins only (USDC) for your first position
Keep collateral OFF to avoid any liquidation risk
Start small ($100-500) to learn the process
Monitor daily for first week to ensure everything works
Understand aTokens - they represent your deposit + interest
Test withdrawal after a few days to verify the process
🚀 Next Steps
Now that you've set up your first position, Lesson 5 will dive deep into Aave's architecture, helping you understand the protocol you're using and prepare for more advanced strategies.
Complete Exercise 4 to track your first position and build your monitoring system.
Remember: Your first position is a learning experience. Start simple, start safe, and build your knowledge gradually. Once you're comfortable with supplying, you can explore borrowing and other protocols.
← Back to Summary | Next: Exercise 4 → | Previous: Lesson 3 ←
Last updated