Lesson 3: Risk Management Fundamentals
🎧 Lesson Podcast
🎬 Video Overview
Lesson 3: Risk Management Fundamentals
🎯 Core Concept: Understanding and Mitigating Risk
Risk management is the difference between sustainable DeFi participation and catastrophic losses. This lesson teaches you to identify, assess, and mitigate the risks inherent in money markets, focusing on practical strategies that protect your capital.
The Brutal Truth
Many participants lose money in money markets not because the protocols fail, but because they misunderstand risk. Understanding liquidation mechanics, recognizing danger signals, and knowing what to avoid are essential skills for safe participation.
💸 Understanding Liquidation
What is Liquidation?
Liquidation is the forced sale of your collateral to repay your debt when your position becomes unsafe. It's triggered automatically when your Health Factor drops below 1.0.
Why Liquidations Happen
Liquidations occur when:
Collateral price drops: Your ETH collateral loses value
Debt grows: Accrued interest increases your debt
Both happen: The double whammy of falling prices and growing debt
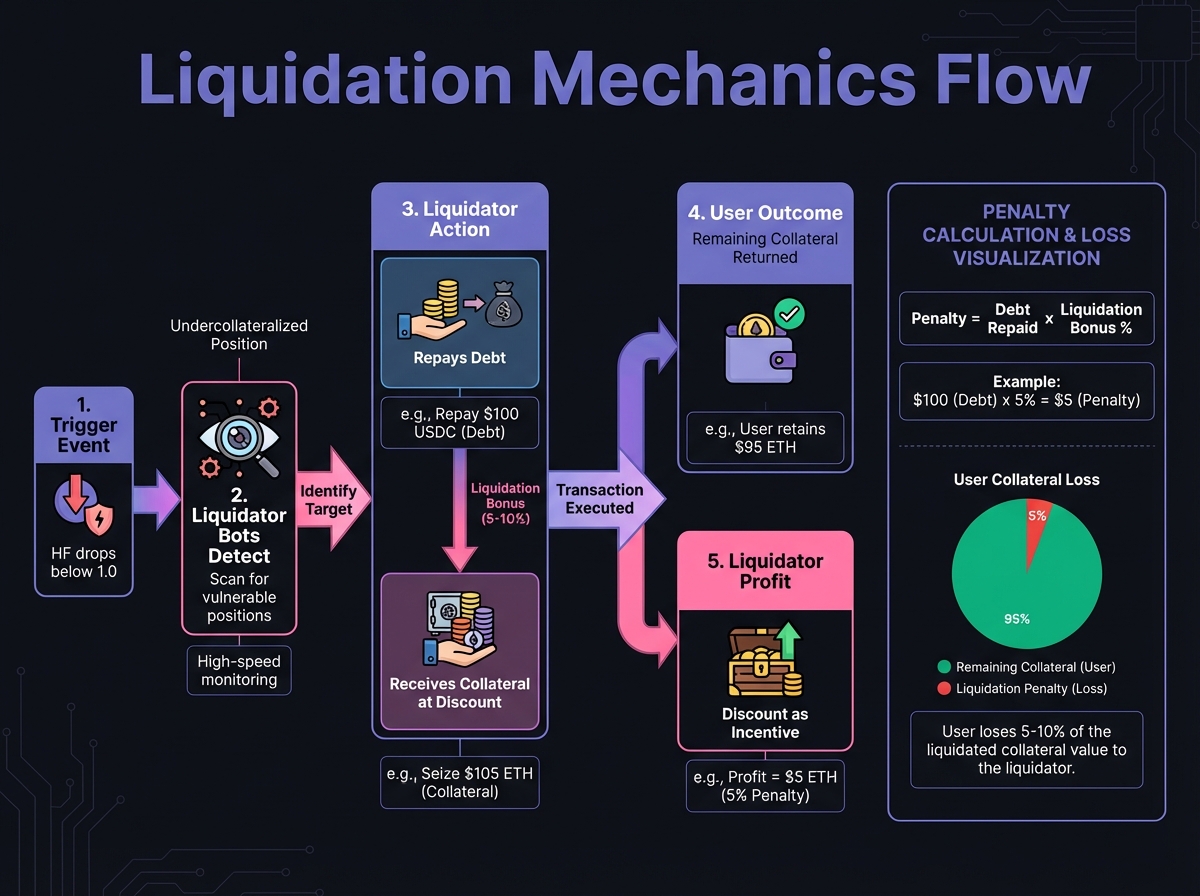
How Liquidation Works
The Process:
Your Health Factor drops below 1.0
Liquidator bots detect the unsafe position
Liquidator repays your debt (or part of it)
Liquidator receives your collateral at a discount (e.g., 5-10% bonus)
Remaining collateral (if any) returns to you
Example:
You borrowed $8,000 USDC against $10,000 ETH
ETH crashes to $8,500, HF drops below 1.0
Liquidator repays $8,000 USDC
Receives ~$8,400 worth of ETH (includes liquidation bonus)
You lose ~$1,600 (from $10,000 to $8,400)
Liquidation penalty: ~5-10% of collateral value
The Liquidation Penalty
Standard Penalties:
Most protocols: 5-10% of liquidated collateral
Some protocols: Fixed percentage (e.g., 8%)
Advanced protocols: Variable penalties based on risk
Why Penalties Exist:
Incentivize liquidators to act quickly
Cover gas costs for liquidation
Deter reckless borrowing
Protect protocol solvency
Real Impact: A 10% liquidation penalty on $10,000 collateral = $1,000 loss, even if you intended to repay the loan.
📊 Health Factor Monitoring
The Critical Thresholds
HF > 2.0: Safe Zone
Comfortable buffer
Can withstand significant volatility
Recommended for beginners
HF = 1.5 - 2.0: Watchful Zone
Adequate but requires monitoring
Monitor daily
Set up alerts
HF = 1.2 - 1.5: Danger Zone
High risk of liquidation
Monitor hourly
Take action immediately
HF < 1.2: Critical Zone
Liquidation likely
Emergency action required
Add collateral or repay immediately
Setting Up Monitoring
Daily Checklist:
Check Health Factor on all borrowing positions
Review collateral prices (are they dropping?)
Calculate interest accrued
Assess if action is needed
Tools:
Protocol dashboards (Aave, Morpho, etc.)
DeFi portfolio trackers (Zapper, DeBank)
Price alerts (set on CoinGecko, CoinMarketCap)
Health Factor alerts (some protocols offer this)
Automatic Protection Strategies
1. Collateral Addition
Add more collateral when HF drops
Increases buffer without repaying debt
Useful if you believe collateral will recover
2. Debt Repayment
Repay part of your loan
Reduces debt, increases HF
Permanent solution (but requires capital)
3. Emergency Exit
Repay entire loan if HF critical
Exit position completely
Locks in losses but prevents liquidation
🎯 Collateral Volatility Considerations
Understanding Volatility Risk
High Volatility Assets:
Meme coins, altcoins
Volatility: 50-200%+ daily swings possible
Risk: Can crash faster than liquidators can act
Medium Volatility Assets:
Major cryptos (ETH, BTC)
Volatility: 5-20% daily swings common
Risk: Manageable with proper HF buffer
Low Volatility Assets:
Stablecoins, LSTs (staked ETH)
Volatility: 1-5% daily swings
Risk: Lowest, but still non-zero
Choosing Collateral Wisely
For Beginners: Use low-volatility collateral
Stablecoins (if protocol allows)
Liquid staking tokens (wstETH, rETH)
Major blue-chip assets (ETH, BTC)
To Avoid (as beginner):
Meme coins
New tokens without price history
Low-liquidity assets
Experimental or isolated assets
The Correlation Risk
What is Correlation?
How closely two assets move together
High correlation = similar price movements
Low correlation = independent movements
Why It Matters:
If borrowing USDC against ETH, you're betting ETH won't crash
If borrowing ETH against BTC, both could crash together
High correlation = higher risk
Example:
Borrowing USDC against ETH: Low correlation (USDC stable, ETH volatile) → Higher risk
Borrowing USDC against USDT: High correlation (both stablecoins) → Lower risk
⚠️ Things to Avoid
1. Don't Chase Points into Insolvency
Many protocols use "Points" programs to incentivize liquidity. These programs reward deposits but don't protect against losses.
The Trap:
High-risk, low-liquidity vault offers 10,000 points
Points might be worth $100 (theoretical value)
If the underlying asset crashes 50%, you lose $5,000
Net result: Massive loss despite points
Rule: Never deposit into high-risk positions solely for points. Points are speculative; principal loss is real.
2. Don't Mistake "Isolated" for "Safe"
In Isolation Mode (Aave) or isolated vaults (Morpho), risk is isolated from the protocol, but not from you.
The Misconception:
"Isolated mode is safer" (for the protocol)
Reality: Your risk is actually more concentrated
Example:
You're the only lender in a niche Morpho vault
Borrower defaults on isolated market
You take the full loss—no shared insurance fund
Protocol is safe, but you're not
Lesson: Isolation protects the protocol, not individual users. Understand that isolated markets can fail completely.
3. Don't Bridge Without Gas
A classic operational error that traps assets.
The Mistake:
Bridge USDC to Sui or Solana
Forget to bridge native gas token (SUI or SOL)
Assets arrive but you can't move them
Solution: Always bridge a small amount of the native token first, or use bridges that include gas.
4. Don't Ignore "Dust" Approval Issues
When approving contracts, default wallet settings often request "Unlimited Approval."
The Risk:
Approve Aave to spend unlimited USDC
If Aave is upgraded maliciously or hacked
Attacker can drain your entire USDC balance
Solution: Use "Just-in-Time" approvals—approve only the exact amount you intend to deposit.
5. Don't Use E-Mode Without Understanding
E-Mode allows extremely high LTVs (up to 97%) for correlated assets.
The Danger:
USDC and USDT seem identical (both $1.00)
But they can depeg (e.g., USDC depegged to $0.87 in March 2023)
At 97% LTV, a 3% depeg = instant liquidation
For Beginners: Avoid E-Mode until you fully understand correlation risk and depeg scenarios.
6. Don't Ignore Idle Liquidity
On Morpho/Euler vaults, check "Idle Liquidity" before depositing.
The Problem:
Vault has 0% idle liquidity (all funds lent out)
You try to withdraw
Transaction fails—no liquidity available
Solution: Only deposit in vaults with >10% idle liquidity for instant withdrawals.
✅ Things to Look Out For (Green Flags)
1. Consumer Protection Wrappers
The Aave App's $1M insurance policy is a game-changer.
Why It Matters:
Protects against smart contract failures
Protects against technical exploits
Provides peace of mind for retail users
Prioritize interfaces offering insurance
For Beginners: Start with insured interfaces when available.
2. Auto-Deleverage (ADL)
Protocols like Kamino and Suilend offer Auto-Deleverage mechanisms.
How It Works:
As position approaches liquidation, ADL partially unwinds
Sells just enough collateral to restore health
Avoids catastrophic total loss
Benefit: Acts as automated risk manager, preventing sudden liquidations.
3. High Idle Liquidity
Healthy vaults maintain reserves for withdrawals.
Target: >10% idle liquidity
Ensures instant withdrawals
Shows good risk management
Indicates sustainable operations
4. Canonical Assets
On L2s and alt-L1s, use canonical (official) versions of assets.
Why It Matters:
Bridge wrappers can depeg (e.g., wUSDC vs native USDC)
Fragmented liquidity reduces efficiency
Official assets are more trusted
Check: Verify you're using the official, canonical version (often listed on protocol documentation).
5. Transparent Curator Track Records
For modular protocols (Morpho, Euler), research curators before depositing.
What to Check:
Historical performance
Risk management practices
Transparency in reporting
Response to past incidents

🛡️ Safety Buffers and Position Sizing
Calculating Safety Buffers
Minimum Buffer: 20-30% above liquidation threshold
Example:
Liquidation Threshold: 85%
You borrow at 65% (20% buffer)
Collateral can drop 20% before liquidation risk
Formula for Buffer: Buffer%=CollateralValueCollateralValue−(Debt/LT)×100%
Example Calculation:
Collateral: $10,000 ETH
Debt: $6,000 USDC
LT: 85%
Buffer=$10,000$10,000−($6,000/0.85)=$10,000$10,000−$7,059=29.4%
Position Sizing Guidelines
Conservative (Beginners):
Borrow 40-50% of maximum LTV
Maintain HF > 2.0
Use stable collateral (ETH, BTC, stablecoins)
Moderate (Experienced):
Borrow 60-70% of maximum LTV
Maintain HF > 1.5
Monitor weekly
Aggressive (Advanced):
Borrow 75-80% of maximum LTV
Maintain HF > 1.3
Monitor daily or use automation
Never:
Borrow at maximum LTV
Let HF drop below 1.2
Use highly volatile collateral without extreme caution
🔄 Emergency Exit Procedures
When to Exit
Exit Immediately If:
HF drops below 1.2
Oracle failure detected
Protocol pause announced
Major exploit reported
Critical collateral depegging (e.g., stablecoin breaks peg)
How to Exit
Option 1: Repay Debt
Calculate total debt (principal + accrued interest)
Ensure you have funds available
Repay via protocol interface
Withdraw collateral
Time: Can take minutes depending on network congestion
Option 2: Add Collateral
Calculate how much collateral needed
Transfer additional collateral
Deposit to increase HF
Time: Fastest option if you have collateral available
Option 3: Partial Repayment
Repay portion of debt to restore HF > 1.5
Buy time to evaluate situation
Decide on final strategy later
Gas Considerations
During High Volatility:
Network congestion increases
Gas fees spike
Transactions may take longer
Have ETH/gas tokens ready
On Layer 2:
Lower gas costs
Faster transactions
Better for active management
Still have gas ready
🎓 Beginner's Corner: Risk Assessment Checklist
Before Opening a Position, Ask:
What's my Health Factor target?
✅ Answer: > 2.0 for beginners
What's the volatility of my collateral?
✅ Check: Historical price movements
✅ Avoid: Assets with >50% daily swings
What happens if price drops 30%?
✅ Calculate: New HF after price drop
✅ Ensure: Still above 1.5
Do I understand liquidation mechanics?
✅ Know: Penalty percentage
✅ Know: What triggers liquidation
Can I monitor this position regularly?
✅ Set up: Alerts and monitoring tools
✅ Commit: Daily/weekly checks
Do I have an exit plan?
✅ Know: How to add collateral
✅ Know: How to repay debt
✅ Have: Funds available for emergency
🔬 Advanced Deep-Dive: Liquidation Mechanics
Hard vs Soft Liquidations
Hard Liquidations (Traditional):
Liquidate entire position
Sell all collateral
Pay liquidation penalty
User loses everything
Soft Liquidations (Advanced Protocols):
Liquidate only enough to restore HF
Partial collateral sale
Smaller penalty
User keeps remaining position
Example:
Position: $10,000 collateral, $8,000 debt, HF = 1.06
Hard liquidation: Sell all $10,000, penalty $500, receive $9,500
Soft liquidation: Sell $1,000, penalty $50, keep $9,000 position with restored HF
Liquidation Incentives
Why Liquidators Exist:
Liquidators are bots/traders who monitor positions
They're incentivized by liquidation bonuses (5-10%)
They pay gas to execute liquidation
They keep the bonus as profit
The Market:
Competitive—multiple liquidators compete
Fast—liquidations happen within seconds
Automated—no human intervention needed
For You: This means you can't "beat the system." If your HF drops below 1.0, liquidation is almost instant.
📊 Real-World Risk Scenario Analysis
Scenario 1: Gradual Price Decline
Setup:
Collateral: 10 ETH @ $2,000 = $20,000
Debt: $12,000 USDC
LT: 85%
Initial HF: 1.42
ETH Drops 10% Each Week:
Week 1: ETH = $1,800
Collateral: $18,000
Debt: $12,000 + interest ≈ $12,050
HF: ($18,000 × 0.85) ÷ $12,050 = 1.27 ⚠️
Week 2: ETH = $1,620
Collateral: $16,200
Debt: $12,050 + interest ≈ $12,100
HF: ($16,200 × 0.85) ÷ $12,100 = 1.14 🚨 CRITICAL
Action Required: Must add collateral or repay debt immediately.
Scenario 2: Flash Crash
Setup: Same as Scenario 1
Flash Crash: ETH drops 40% in 1 hour
Immediate Impact:
ETH = $1,200
Collateral: $12,000
Debt: $12,000
HF: ($12,000 × 0.85) ÷ $12,000 = 0.85 💥 LIQUIDATED
Result: Position liquidated immediately. No time to react.
Lesson: Always maintain HF > 1.5 to withstand sudden moves.
Interactive Health Factor Calculator
Practice calculating your position's Health Factor and see how price drops affect your safety:
Launch Collateral Ratio Calculator →
Launch Liquidation Price Calculator →
🔑 Key Takeaways
Liquidation is real and costly—penalties are 5-10% of collateral
Health Factor is your lifeline—monitor it constantly, keep it > 2.0
Avoid dangerous practices—don't chase points, don't ignore isolated risks
Look for safety features—insurance, ADL, idle liquidity
Have an exit plan—know how to add collateral or repay debt quickly
Position size conservatively—borrow 40-50% of max, not 80%
Monitor regularly—daily checks prevent surprises
🚀 Next Steps
Now that you understand risk management, Lesson 4 will walk you through setting up your first actual position. You'll learn to choose a protocol, set up your wallet, make your first deposit, and monitor your position safely.
Complete Exercise 3 to practice risk assessment and build your risk management framework.
Remember: Risk management is not optional. Understanding liquidation, monitoring Health Factor, and avoiding dangerous practices will protect your capital. Ignore these fundamentals, and you will lose money.
← Back to Summary | Next: Exercise 3 → | Previous: Lesson 2 ←
Last updated