Lesson 4: Your First Perpetual Position
🎧 Lesson Podcast
🎬 Video Overview
Lesson 4: Your First Perpetual Position
🎯 Core Concept: Start Simple, Start Safe
Your first perpetual position should be a learning experience, not a high-stakes gamble. This lesson walks you through setting up a safe, low-leverage position that minimizes risk while teaching you the mechanics.
The First-Time Trader Checklist
Before you open a single position, ensure you:
✅ Understand funding rates (Lesson 1)
✅ Can calculate liquidation prices (Lesson 2)
✅ Know the difference between isolated and cross margin
✅ Have funds on the correct network (L2 or AppChain)
✅ Know how to close positions (practice on testnet first!)
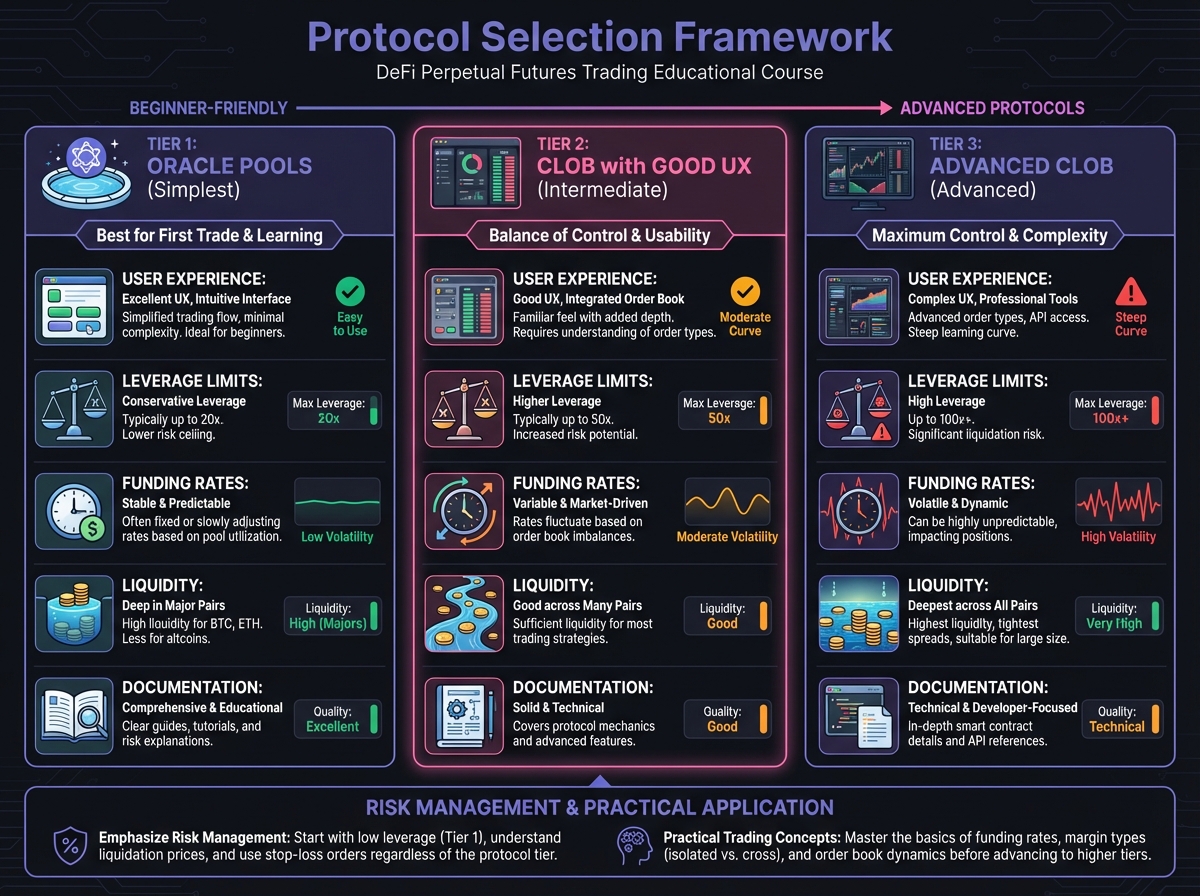
🏁 Step 1: Choose Your Protocol
Beginner-Friendly Protocols
Tier 1: Oracle Pools (Simplest) ⭐ Best for beginners
GMX V2 (Arbitrum)
Gains Network (Polygon)
Why: Simple swap-like interface, zero slippage, no order book complexity
Tier 2: CLOB with Good UX ⭐⭐ Good for learning
Hyperliquid (AppChain)
Drift (Solana)
Why: CEX-like experience, limit orders, but requires understanding order books
Tier 3: Advanced CLOB ⭐⭐⭐ For experienced traders
dYdX v4 (Cosmos)
EdgeX (Starknet)
Why: More features, but more complexity
Avoid for First Position:
❌ Protocols with very high leverage (50x+)
❌ Protocols with unclear liquidation mechanics
❌ Protocols with poor documentation
❌ Protocols on unfamiliar chains
Protocol Selection Framework
Ask yourself:
What's the user experience?
Is the interface intuitive?
Are there tutorials or guides?
What's the leverage limit?
Start with protocols that cap leverage at 10x
Avoid 50x+ for first trades
What's the funding rate?
Check current funding rates
High funding = expensive to hold
What's the liquidity?
More liquidity = better execution
Check TVL and open interest
🌐 Step 2: Wallet Setup and Network Configuration
Choose Your Wallet
EVM-Compatible (for Arbitrum, Optimism, Base):
MetaMask (most popular)
Rabby (multi-chain optimized)
Coinbase Wallet
Cosmos (for dYdX v4):
Keplr (recommended)
MetaMask (with Cosmos support)
Solana (for Drift):
Phantom
Solflare
Network Configuration
For GMX (Arbitrum):
Open MetaMask
Click network dropdown
Add network manually or use Chainlist.org
Network details:
Network Name: Arbitrum One
RPC URL: https://arb1.arbitrum.io/rpc
Chain ID: 42161
Currency: ETH
Block Explorer: https://arbiscan.io
For Hyperliquid:
Connect MetaMask (Arbitrum network)
Navigate to Hyperliquid interface
Click "Connect Wallet"
Sign message to enable trading (session keys)
Acquire Assets
Option 1: Bridge from CEX
Buy USDC on centralized exchange
Withdraw to Ethereum Mainnet
Bridge to target network (Arbitrum, Optimism, etc.)
Use official bridge or third-party (Synapse, Stargate)
Option 2: Swap on DEX
Have ETH on target network
Swap ETH for USDC on Uniswap or similar
Use USDC as collateral
Gas Considerations:
Keep some ETH/native token for gas
L2s require minimal gas ($0.10-1.00)
AppChains may have zero gas (Hyperliquid)
💰 Step 3: Deposit Collateral
For Oracle Pools (GMX)
Navigate to GMX interface
Click "Connect Wallet"
Select "Deposit" tab
Choose asset (USDC recommended for beginners)
Enter amount (start small: $100-500)
Click "Deposit"
Approve transaction in wallet
Wait for confirmation
For CLOB (Hyperliquid)
Navigate to Hyperliquid interface
Connect wallet
Enable trading (sign message for session keys)
Click "Deposit"
Enter amount (USDC.e from Arbitrum)
Approve bridge transaction
Wait for confirmation (may take a few minutes)
Important: Hyperliquid uses a bridge—this is a trust point. Funds are locked in bridge contract.
📊 Step 4: Analyze Before You Trade
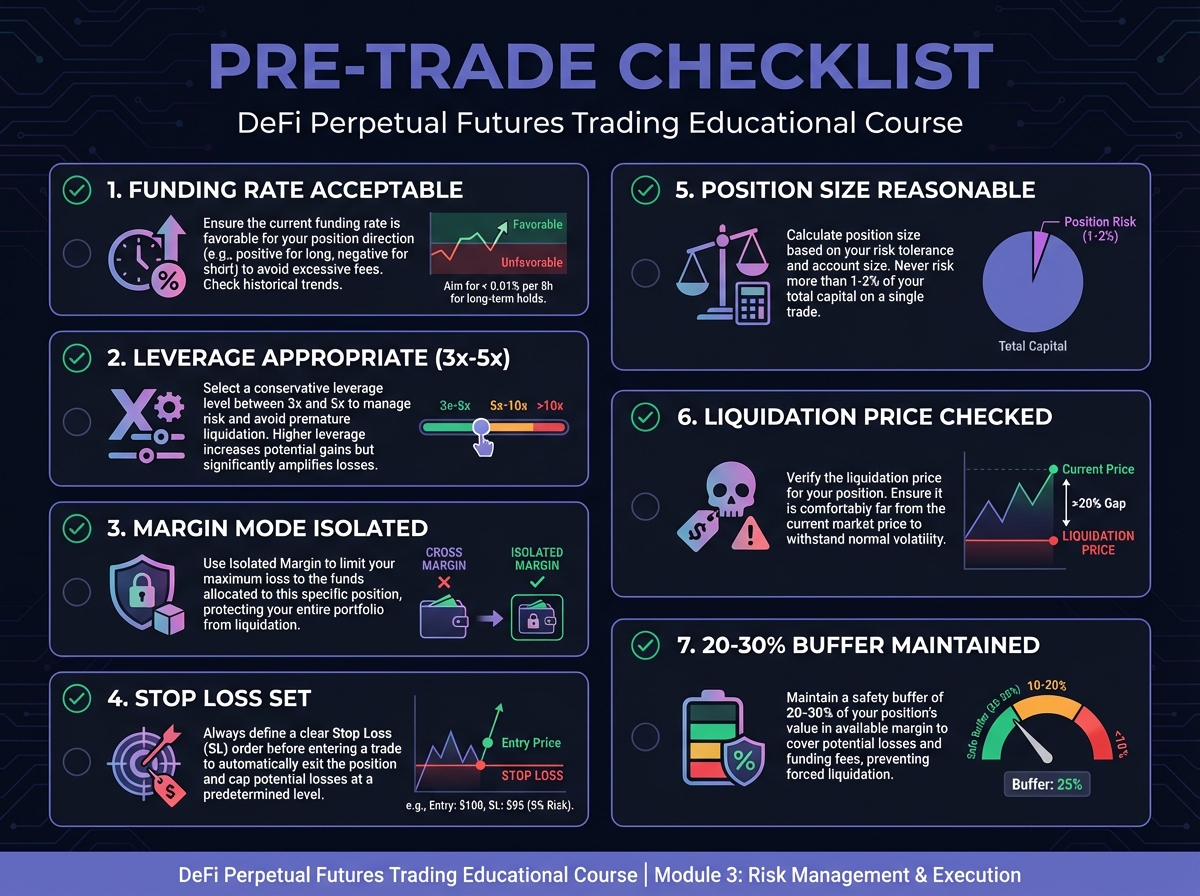
Check Funding Rate
Why It Matters: High funding rates can eat your profits
How to Check:
Navigate to market page
Look for "Funding Rate" or "Funding"
Check if positive (you pay) or negative (you receive)
Calculate annualized rate
Red Flags:
Funding rate > 0.05% per hour (very expensive)
Annualized > 50% (extremely expensive)
Consider waiting or choosing different market
Check Open Interest
Why It Matters: High OI = active market, low OI = risky
How to Check:
Look for "Open Interest" or "OI" metric
Compare to historical averages
Check OI trend (increasing = healthy)
Warning Signs:
OI suddenly dropping (liquidity leaving)
OI very low (illiquid market)
OI extremely high (crowded trade, high funding)
Check Liquidation Price
Before Opening Position:
Use protocol's liquidation calculator
Enter your planned margin and leverage
Note the liquidation price
Check if you have 20-30% buffer
Example:
Entry: $2,500
Leverage: 5x
Liquidation: ~$2,000
Buffer: 20% (safe)
🎯 Step 5: Configure Your Position
Choose Market
For Beginners: Start with major pairs
ETH/USD
BTC/USD
Why: Most liquid, lowest funding rates, most stable
Avoid:
Meme coins
Low-liquidity pairs
Exotic assets
Choose Direction
Long: Betting price goes up
Use when bullish
Pay funding if rate is positive
Short: Betting price goes down
Use when bearish
Receive funding if rate is positive
For First Trade: Choose direction based on clear technical or fundamental analysis, not emotion.
Choose Margin Mode
Isolated Margin (Recommended for beginners):
✅ Limited risk (only margin at risk)
✅ Easy to understand
✅ Safe for learning
Cross Margin (Advanced):
❌ Entire account at risk
❌ Can liquidate all positions
✅ Better for hedging strategies
For First Trade: Always use isolated margin.
Choose Leverage
Beginner Leverage:
2x-3x: Very safe, low risk
4x-5x: Moderate risk, recommended
6x-10x: Higher risk, for experienced
Calculation:
5x leverage = 20% price move = liquidation
10x leverage = 10% price move = liquidation
For First Trade: Start with 3x-5x maximum.
Set Position Size
Rule of Thumb: Risk only 1-5% of total capital per trade
Example:
Total Capital: $10,000
Risk Per Trade: 2% = $200
Margin: $200
Leverage: 5x
Position Size: $1,000
Why Small: First trades are for learning, not profit maximization.
📝 Step 6: Place Your Order
Order Types
Market Order (Oracle Pools):
Executes immediately at oracle price
Zero slippage (on oracle pools)
Simple, one-click execution
Limit Order (CLOB):
Executes only at your specified price
May not fill if price doesn't reach your level
Better control, but requires patience
For First Trade: Use market order (simpler) or limit order close to current price.
Set Stop Loss
Why Critical: Limits your maximum loss
How to Set:
Identify technical support/resistance
Set stop loss below support (long) or above resistance (short)
Ensure stop loss is 20-30% away from entry (for 5x leverage)
Example:
Entry: $2,500
Support: $2,400
Stop Loss: $2,390 (below support)
Max Loss: $110 (4.4% of position, 22% of margin)
For First Trade: Always set a stop loss.
Set Take Profit (Optional)
Why Useful: Locks in profits automatically
How to Set:
Identify technical target
Set take profit at target
Consider partial profits (close 50% at first target)
For First Trade: Optional, but good practice.
Review Before Submitting
Final Checklist:
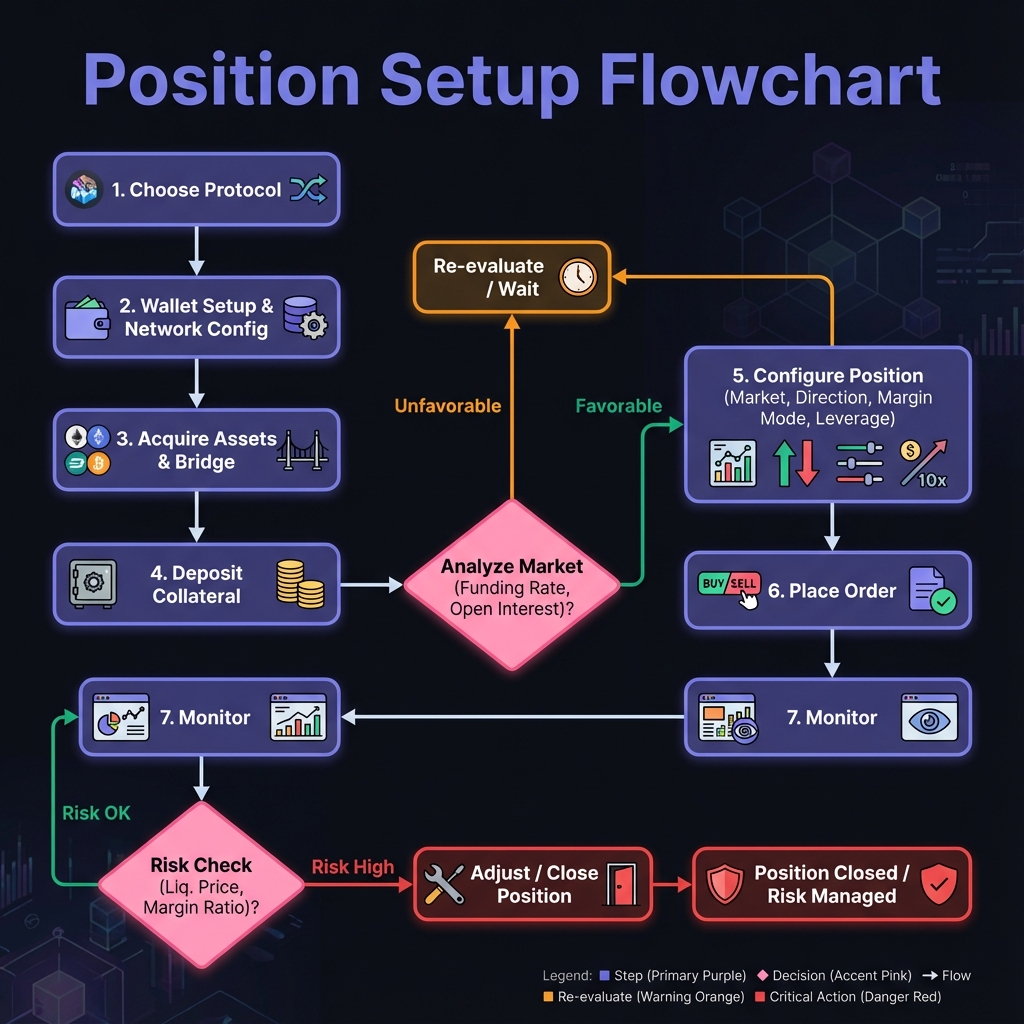
⚡ Step 7: Execute and Monitor
Execute Order
Click "Place Order" or "Open Position"
Approve transaction in wallet
Wait for confirmation
Position appears in "Open Positions"
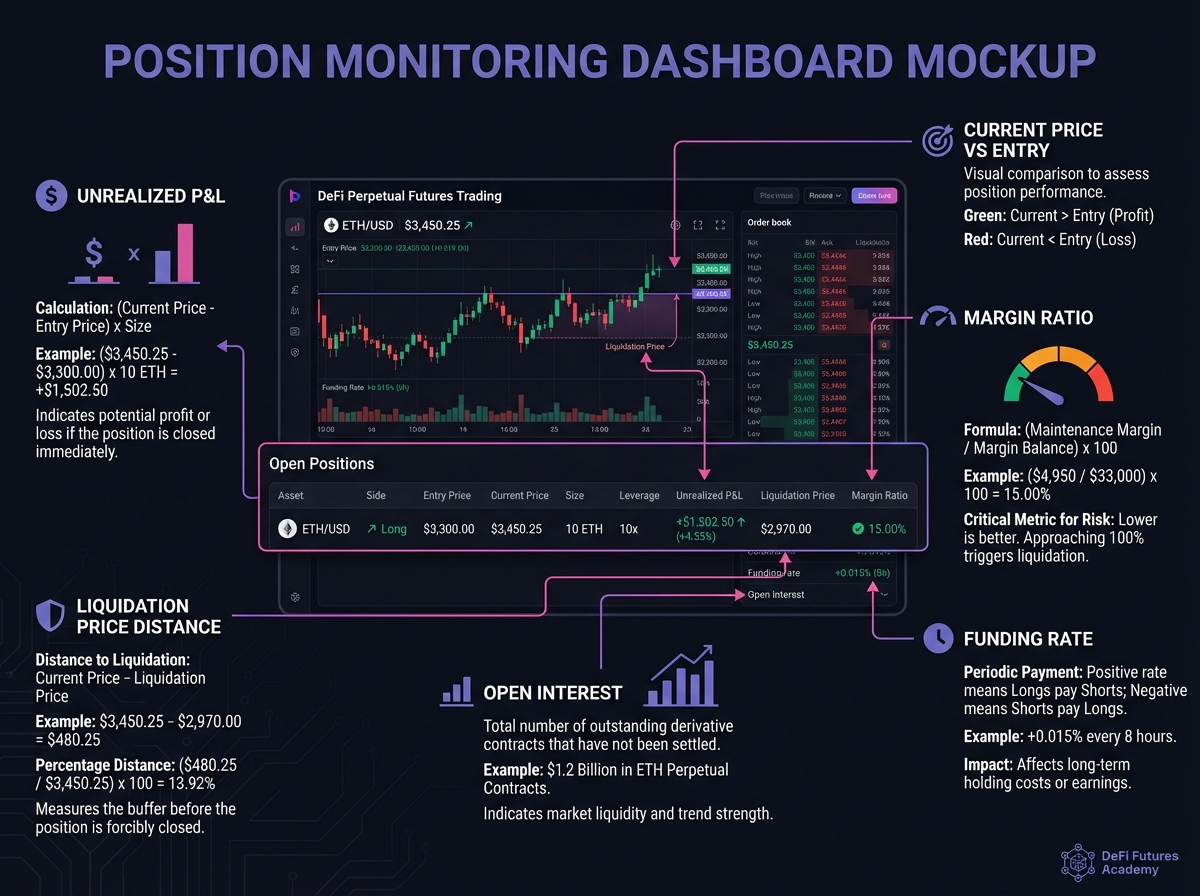
Monitor Your Position
Key Metrics to Watch:
Current Price: How far from entry?
Unrealized P&L: Profit or loss?
Liquidation Price: How close?
Margin Ratio: Percentage of margin used
Funding Rate: Current funding cost
Monitoring Frequency:
Active Trading: Check every few minutes
Swing Trading: Check daily
Never: Set and forget (always monitor)
When to Close
Close Immediately If:
Price hits stop loss
Price hits take profit
Funding rate becomes extreme
Market conditions change fundamentally
Consider Closing If:
Position is profitable and you're unsure
Liquidation price getting close
Better opportunity elsewhere
🎓 Beginner's Corner: Common First-Trade Mistakes
Mistake 1: Too Much Leverage
The Error: "I'll use 20x to maximize profits!"
The Reality: 20x leverage = 5% price move = liquidation. Very risky.
The Fix: Start with 3x-5x maximum.
Mistake 2: No Stop Loss
The Error: "I'll just watch it and close if it goes bad."
The Reality: Emotions take over, losses compound, liquidation happens.
The Fix: Always set stop loss before opening position.
Mistake 3: Ignoring Funding Rates
The Error: "Funding is only 0.01%, that's nothing."
The Reality: 0.01% per hour = 87.6% APR. On leveraged position, this is huge.
The Fix: Always check annualized funding rate.
Mistake 4: Cross Margin on First Trade
The Error: "Cross margin is easier, I'll use that."
The Reality: One bad trade can liquidate your entire account.
The Fix: Always use isolated margin for first trades.
Mistake 5: Trading Emotionally
The Error: "ETH is pumping, I need to get in now!"
The Reality: FOMO leads to bad entries, no stop loss, high leverage.
The Fix: Have a plan, stick to it, don't trade on emotion.
🔬 Advanced Deep-Dive: Position Management
Adding Margin
When to Add:
Price moving against you but still confident
Want to lower liquidation price
Want to increase position size
How to Add:
Navigate to position
Click "Add Margin" or "Deposit"
Enter additional amount
Approve transaction
Effect: Lowers liquidation price, increases safety buffer.
Reducing Position Size
When to Reduce:
Taking partial profits
Reducing risk
Market conditions changing
How to Reduce:
Navigate to position
Click "Close" or "Reduce"
Enter amount to close (e.g., 50%)
Approve transaction
Effect: Locks in profits, reduces exposure.
Trailing Stop Loss
Advanced Technique: Stop loss that follows price
How It Works:
If price moves in your favor, stop loss moves up (long) or down (short)
Locks in profits while allowing for more upside
Example:
Entry: $2,500
Initial Stop: $2,400
Price moves to $2,600
Trailing stop moves to $2,500 (break-even)
Price moves to $2,700
Trailing stop moves to $2,600 (locks in $100 profit)
For First Trade: Not necessary, but good to know exists.
📊 Real-World Example: Complete First Trade
Setup:
Protocol: GMX V2 (Arbitrum)
Market: ETH/USD
Direction: Long
Entry: $2,500
Margin: $200 (isolated)
Leverage: 5x
Position Size: $1,000
Pre-Trade Analysis:
Funding Rate: 0.005% per hour (acceptable)
Open Interest: $500M (healthy)
Liquidation Price: $2,000 (20% buffer)
Stop Loss: $2,400 (4% risk)
Execution:
Connect MetaMask (Arbitrum network)
Deposit $200 USDC
Navigate to ETH/USD market
Select "Long", "Isolated Margin", "5x Leverage"
Set stop loss at $2,400
Click "Open Position"
Approve transaction
Position opened
Monitoring (After 24 hours):
Current Price: $2,550
Unrealized P&L: +$50 (2% gain)
Funding Paid: $1.20 (24 hours × 0.005% × $1,000)
Net P&L: +$48.80
ROI: 24.4% on margin
Decision: Price hit first target, close 50% to lock profits, let 50% run with trailing stop.
🛠️ Calculate Your Position
Use this calculator to plan your first position:
🔑 Key Takeaways
Start with simple protocols (Oracle pools) and major pairs (ETH, BTC)
Always use isolated margin and low leverage (3x-5x) for first trades
Check funding rates and open interest before opening
Always set stop loss before executing
Monitor positions actively, don't set and forget
Start small—first trades are for learning, not profit maximization
Have a plan and stick to it—don't trade emotionally
🚀 Next Steps
Complete Exercise 4 to practice position setup
Proceed to Module 2 to learn about specific protocols
Start with a small test position ($50-100) to learn mechanics
Join protocol communities for support and questions
Last updated